5 Best Popular Posts Widgets For Blogger

Adding the Popular Posts Widget for Blogger

Just click on your blog title, access the "Layout" menu, click "Add a Gadget" and choose "Popular Posts". A window will appear asking you to configure the widget by choosing which posts you'll feature (e.g. those that were most viewed in the past 7 days or 30 days or from the beginning of your blog). You'll also be asked to choose how many posts you'll feature in your Popular Posts section and select if you'll show the post title only or along with the image thumbnail and/or the snippet. (Remember that each widget style has different requirements, so follow the styles and instructions carefully to find out if you need the snippet and image thumbnail or not).
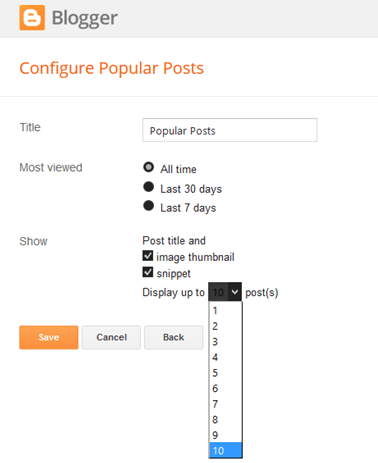
Configuring Popular Posts Widget for Blogger

Popular Posts Style 1 - Box within a box

This is an interesting widget style since it uses your snippet and image thumbnail in a unique way. Your snippet is written in opaque text and placed in a small transparent box. This, in turn, is placed in a bigger rectangular box, wherein your image thumbnail is used as a background. Choosing this Popular Posts Widget for Blogger can be a great option if you want to brighten up your blog and grab the attention of readers with your colorful photos.
CSS code:

Popular Posts Style 2 - Large thumbnails with small post titles underneath

This uses the same code as the basic Blogger Popular Posts Widget with a few tweaks. Popularized by well-known blogs, this style is eye-catching because it focuses on pictures, which don't only summarize the posts' content but also add visual drama to the entire page. This is particularly useful for blogs that focus on clothes, makeup, art and other topics that highly depend on visual presentation to better express ideas.

CSS code:

Popular Posts Style 3 - Colorful boxes

If your blog needs a pop of color, this is the right choice for you. This widget style presents your Popular Posts in several boxes that feature a thumbnail image and have bright, eye-catching shades like light green, ocher yellow and vivid orange. Each box has a different color, and you can add up to four boxes.

popular posts widget for blogger

CSS code:

Popular Posts Style 4 - Grid layout

Just like the large-picture widget style, the grid layout is an excellent option if you want to showcase your pictures or if your blog depends on visual information. However, the title of your posts won't be included in the layout, so readers will have to hover their mouses on the images to read the titles.

popular posts widget for blogger

CSS code: 

Popular Posts Style 5 - Numbered posts

If you love numbered lists, or if you'd like to make your blog more organized, this can be the perfect option. By using the code for this widget style, your Popular Posts will be automatically numbered and will feature clean, minimalistic boxes that include your snippet and image thumbnail.
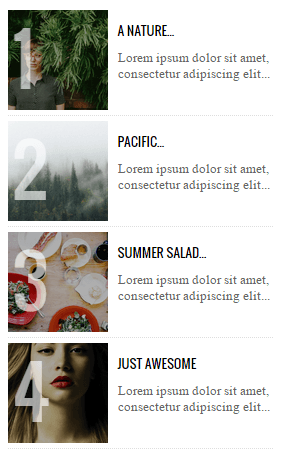
popular posts widget for blogger

CSS code:
These are just some of the widget styles you can choose from. When you've picked a style you want, make sure to copy its CSS code. Once you do so, go to your blog, click "Theme" on the left side and select "Edit HTML" under the template preview.

These next codes need to be pasted above the "
" or "" tags, so check the instruction to know exactly where you need to put the code.


Adding the CSS

When the template editor has opened, click anywhere inside the code area and hit CTRL + F or Command F to search the following tag:
Just ABOVE the  tag, copy-paste the CSS code of one of the styles above.


Important: If the Popular Posts widget is located in the footer of your blog, remove the .sidebar class found in the CSS code in order to make it work.

Please note that most of the styles are using the 'Oswald' font which you need to add to your template's code as well.

So, search for this tag:
... and just BELOW it, add this line:

Adding the JavaScript

These styles also require using a script in order to resize the popular posts image / thumbnail and trim the post snippet and title. To add the JavaScript code, search the  tag and paste the following script just above it:
Note: if you have already the jQuery library in your template, remove the line in red.

After you have added all the codes in the right place, press the "Save theme" button to save the changes.


Comments

Popular posts from this blog

13 websites to register your free domain

Register your Free Domain Now!! 1)  .tk Dot TK is a FREE domain registry for websites on the Internet. It has exactly the same power as other domain extensions, but it’s free! Because it’s free, millions of others have been using .TK domains since 2001 – which makes .TK powerful and very recognizable.  Your website will be like www.yourdomainname.tk . It is free for 1 year. It’s a ccTLD domain whixh having the abbreviation  Tokelau. To create a .tk domain, Visit   www.dot.tk 2) co.cc Co.cc is completely free domain which is mostly used by blogspot bloggers because of it’s easy to use DNS system. Creating a co.cc for blogger is simple ( for instructions- “click here”). Your website will be like www.yourdomainname.co.cc . To create a .co.cc domain, visit www.co.cc 3)   co.nr co.nr is too like co.cc. Your website will be like  www.yourdomainname.co.nr . You can add it for blogger also.. To create a .co.cc domain, vi...

How to Put Google Adsense Below Post Title in Blogger?

Adsense is used by majority of expert bloggers for their website monetization because it is a cookie based contextual advertising system that shows targeted ads relevant to the content and reader. As bloggers are paid on per click basis, they try various ad placements on the blog to  increase the revenue  and get maximum clicks on the ad units. Well, on some blogs, you might have seen Adsense ad units placed below the post title. Do you know why? It is because the area just below the post title gets the most exposure and is the best place to put AdSense ad units to increase  Click Through Rate (CTR). Even though ads below post title work like a charm but this doesn’t mean that it will work for you as well. If you want to find out the best AdSense ads placement for your blog, try experimenting by placing ads at various locations such as header, sidebar, footer, etc. You can try other  blog monetization methods  as well to effectively monetize y...

what is LOREM ipsum and why do designers use it

What is Lorem Ipsum? Lorem Ipsum  is simply dummy text of the printing and typesetting industry. Lorem Ipsum has been the industry's standard dummy text ever since the 1500s, when an unknown printer took a galley of type and scrambled it to make a type specimen book. It has survived not only five centuries, but also the leap into electronic typesetting, remaining essentially unchanged. It was popularised in the 1960s with the release of Letraset sheets containing Lorem Ipsum passages, and more recently with desktop publishing software like Aldus PageMaker including versions of Lorem Ipsum. Why do we use it? It is a long established fact that a reader will be distracted by the readable content of a page when looking at its layout. The point of using Lorem Ipsum is that it has a more-or-less normal distribution of letters, as opposed to using 'Content here, content here', making it look like readable English. Many desktop publishing packages and web page editors now...

How to Bypass Right Click Block on Any Website

In order to block the right-click activity, most websites make use of JavaScript which is one of the popular scripting languages used to enhance functionality, improve user experience and provide rich interactive features. In addition to this, it can also be used to strengthen the website’s security by adding some of the simple security features such as  disabling right-click ,  protecting images ,  hiding or masking parts of a web page  and so on. How JavaScript Works? Before you proceed to the next part which tells you how to disable the JavaScript functionality and bypass any of the restrictions imposed by it, it would be worthwhile for you to take up a minute to understand how JavaScript works. JavaScript is a client side scripting language (in most cases), which means when loaded it runs from your own web browser. Most modern browsers including IE, Firefox, Chrome and others support JavaScript so that they can interpret the code and carry out action...

[ FREE ][ more than 15 gb for free ] Offcloud vs Bitport vs Seedr :which is best among three to direct download from torrent to cloud storages like google drive ,one drive ,dropbox etc.

Offcloud : [RECOMMENDED BY ME] [AS OF 17-july-2017] Offcloud is a little different from the rest of the providers we’ve looked at, as it isn’t focused on downloading torrents. The company markets itself as “a simple, elegant and intuitive  SaaS  to retrieve any data from the cloud.” We were surprised at the amount of different sources Offcloud supports for downloading, and it even has a ticket box that allows users to suggest new sites to support.  pros: best part you can direct download to your cloud storage like google drive , mega.NZ,one drive ,Dropbox,etc.. Cons: only 3 links permitted to download over free account ..that limit is per months .. you can buy a premium account to bypass this .............. else you can also use a fake email generator and add a remote account to cloud download bypasssing above limit.. Note that Off-cloud doesn’t intend to act as a “seedbox,” which is a server used to boost a user’s ration on private trackers by perpetua...

Batch file to C++ souce code generator ...

Batch file to C++ souce code generator ... Well this project was made upon CODEBLOCK using c++ HERE IS THE SOURCE CODE: download it as .cpp form by clicking here.. mirror 1                                                   mirror 2. One drive if YOu want the exe file only then click here (500 KB) Mirror 1. MULTCLOUD  FOR PASSWORD TO THIS SITE VISIT THE FOLLOWING LINK OR SUMBIT THE FORM BELOW  >>> LINK :   https://goo.gl/forms/DiQHvEjfavsaU18U2                              or Loading...

Binary to Decimal using Stack in C

CODE 1 2 3 4 5 6 7 8 9 10 11 12 13 14 15 16 17 18 19 20 21 22 23 24 25 26 27 28 29 30 31 32 33 34 35 36 37 38 39 40 41 42 43 44 45 46 47 48 49 50 51 52 #include <stdio.h> #include <stdlib.h> #define SIZE 8 int STACK[SIZE],TOP =- 1 ; int power ( int i) { int res = 1 ; while (i -- ) { res = res * 2 ; } return res; } void push ( int n) { if (TOP == SIZE) printf( "OVerflow" ); else STACK[ ++ TOP] = n; } int pop () { if (TOP ==- 1 ) return - 1 ; else return STACK[TOP -- ]; } void main () { int num,i = 0 ,arr[SIZE],j,res = 0 ,temp; printf( "Enter the number" ); scanf( "%d" , & num); printf( " \n Entered number=%d \n " ,num); while (num) { arr[i ++ ] = num % 10 ; num /= 10 ; } for (j = i - 1 ;j >= 0 ;j -- ) push(arr[j]); for (j = 0 ;j < i;j ++ ) { res = res + (pop() * power(j)); } printf( " \n Result=%d" ,res); getchar...

Facebook's First Layout

... More about fb: Facebook paid a whooping $8.5 Million to buy "Fb.com" domain!! So next time instead of typing "facebook.com" you can just type in "Fb.com" to save time!! Facebook acquired the domain sometime last year from the American Farm Bureau Federation, which uses fb.org as its primary domain. At its annual meeting in Atlanta, the non-profit revealed that it earned $8.5 million on the sale of fb.com The last high-profile domain purchase by Facebook was for Facebook.com, all the way back when it was known as TheFacebook. The company paid $200,000 in August 2005 to acquire the domain, 42.5 times less than what Facebook spent to acquire fb.com. While the Facebook.com purchase was expensive for the company back then, it’s an investment that has clearly paid off. The company is obviously hoping that fb.com will also pay off. source: https://en.wikipedia.org/wiki/File:Original-facebook.jpg

Android :Edittext Format space after Each 4 digit/Character

Replace EditText with your EditText Variable 1 2 3 4 5 6 7 8 9 10 11 12 13 14 15 16 17 18 19 20 21 22 23 24 25 26 27 28 29 30 31 32 33 34 35 36 37 38 39 40 41 42 43 44 45 EditText . addTextChangedListener ( new TextWatcher () { byte count1 = 0 ; byte count2 = 0 ; @Override public void beforeTextChanged ( CharSequence s , int start , int count , int after ) { count1 = ( byte ) s . length (); } @Override public void onTextChanged ( CharSequence s , int start , int before , int count ) { count2 = ( byte ) s . length (); } @Override public void afterTextChanged ( Editable s ) { String initial = EditText . getText (). toString (); ...

Binary Search Tree in C++( dynamic memory based )

1 2 3 4 5 6 7 8 9 10 11 12 13 14 15 16 17 18 19 20 21 22 23 24 25 26 27 28 29 30 31 32 33 34 35 36 37 38 39 40 41 42 43 44 45 46 47 48 49 50 51 52 53 54 55 56 57 58 59 60 61 62 63 64 65 66 67 68 69 70 71 72 73 74 75 76 77 78 79 80 81 82 83 84 85 86 87 88 89 90 91 92 93 94 95 96 97 98 99 100 101 102 103 104 105 106 107 108 109 110 111 112 113 114 115 116 117 118 119 120 121 122 123 124 125 126 127 128 #include<bits/stdc++.h> using namespace std; struct bst { int val; bst * left, * right; }; bst * root = nullptr; void srch ( int num,bst * head) { if (head == nullptr){ cout << " \n Number is not present \a " << endl; return ; } if (head -> val == num) { cout << " \n Number is present \n\a " ; return ; } else { if (num < head -> val) srch(num,head -> left); else srch(num,head -> right); ...